
Add a custom view
Description
A simple tutorial introducing the basics of Plone development.
In this tutorial we add a browser view. Plone uses views to display dynamic content.
There are now two ways to add views to Plone; Zope 3 and Grok. This tutorial covers the Zope 3 method. For more information about views, see the Views and viewlets section of the developer manual.
There are 3 parts to our view; a Python class, a page template, and a ZCML registration. We will add the two files and edit configure.zcml in the browser directory.
Register the view
-
Edit the configure.zcml file in the browser directory. Open configure.zcml in your editor and add this just before the closing </configure> tag.:
<browser:page
    name="hello_world_view"
    for="*"
    permission="zope2.View"
    class=".hello_world_view.HelloWorldView"
    />
Note
- We use the name attribute to access the view.
- The for attribute allows us to limit context to a particular interface. With the asterisk, we are not limiting access.
- The permission attribute allows us to limit access with a permission. In this case, we have a wide open permission.
- The class attribute points to our Python class. Here, we have a HelloWorldView class in a file named hello_world_view.py.
-
If you have not already done so, you need to define the browser namespace in configure.zcml by adding this to the configure tag.:
xmlns:browser="http://namespaces.zope.org/browser"
If you also went through the simple form tutorial, then configure.zcml should look something like this when you are done.:
<configure
    xmlns="http://namespaces.zope.org/zope"
    xmlns:browser="http://namespaces.zope.org/browser"
    i18n_domain="example.helloworld">

  <include package="plone.app.contentmenu" />

  <!-- -*- extra stuff goes here -*- -->

    <!-- this is our simple form -->
    <browser:page
        name="hello_world_form"
        for="*"
        class=".hello_world_form.HelloWorldFormView"
        permission="zope2.View"
        />

    <!-- this is our custom view -->
    <browser:page
        name="hello_world_view"
        for="*"
        permission="zope2.View"
        class=".hello_world_view.HelloWorldView"
        />

</configure>
Create Python class
-
We need to create our Python class. In the browser directory, create a file named hello_world_view.py and add the following code.:
from Products.Five import BrowserView
from Products.Five.browser.pagetemplatefile import ViewPageTemplateFile

class HelloWorldView(BrowserView):

    template = ViewPageTemplateFile('hello_world_view.pt')

    def __call__(self):
        """"""
        self.hello_name = getattr(self.context, 'hello_name', 'World')
        return self.template()
Our BrowserView class is a Python callable. The __call__() method is the entry point. In it, we add a hello_name attribute to the view. Our page template will use the value of hello_name when the page is rendered.
The logic in our class is pretty simple. If our context has a hello_name attribute, then we use its value in our view. If not, we use the string 'World'.
In the class, we also define our page template hello_world_view.pt and save it in the template attribute.
Create page template
The third part of our view is the page template.
-
In the browser directory, create a file named hello_world_view.pt and add the following:
<html xmlns="http://www.w3.org/1999/xhtml"
      xmlns:metal="http://xml.zope.org/namespaces/metal"
      xmlns:tal="http://xml.zope.org/namespaces/tal"
      metal:use-macro="context/main_template/macros/master">

    <metal:block fill-slot="content-core">
        <div>
            <h1>Hello
                <span tal:content="view/hello_name">this gets replaced</span>
            </h1>
        </div>
    </metal:block>

</html>
Plone uses Zope Page Templates (ZPT). For great documentation on ZPT and the TAL, TALES, and METAL languages, see the TAL page templates section of the developer manual, and the TAL/TALES & METAL Reference Guide
In the above code, we define some xml namespaces; metal and tal that we use in our template.:
xmlns:metal="http://xml.zope.org/namespaces/metal"
xmlns:tal="http://xml.zope.org/namespaces/tal"
The metal:use-macro statement tells ZPT to use main_template to draw our page.:
metal:use-macro="context/main_template/macros/master"
The master template main_template contains predefined slots, or areas on the page, that we can fill with content from our template.
Anything in our code, between the:
<metal:block fill-slot="content-core">
and:
</metal:block>
gets put in the content-core area of main_template and is displayed on our page.
We also have access to our view class using the view namespace. In our case, we are interested in view/hello_name.:
<span tal:content="view/hello_name">this gets replaced</span>
In our Python class, we defined a hello_name attribute. This code says take the value of the view/hello_name attribute and use it as the content for the span tag. So, the string "this gets replaced" gets replaced with the value of view/hello_name.
Access the view
To access the view, restart your instance to have access to the new view
Then, add @@hello_world_view to the end of an object url in your plone site.:
http://localhost:8080/Plone/my-hello-world-person/@@hello_world_view
Since our object has a hello_name attribute, the value is displayed along with the word Hello.

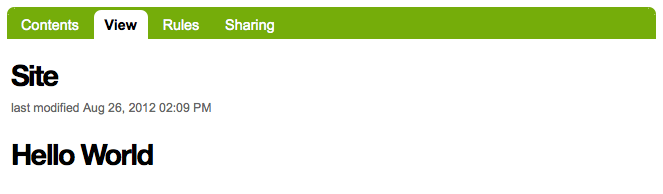
We can also call our view on the root of the site.:
http://localhost:8080/Plone/@@hello_world_view
The root of the site does not have a hello_name attribute, so Hello World is displayed.
For a more in depth explanation of views, see the Views and viewlets section of this manual.